Table of Contents
Keybind Manager
Keybinds in the Wurst Client allow the user to toggle hacks and run commands at the press of a button. The Keybind Manager is a feature that allows the user to easily create, edit, and delete keybinds in-game. This article will provide an overview of the Keybind Manager and explain how to use it to customize keybinds to improve gameplay experience.
Aside from the Keybind Manager, keybinds can also be managed in chat using the .binds command, or in the Navigator GUI (with limited capabilities).
Opening the Keybind Manager
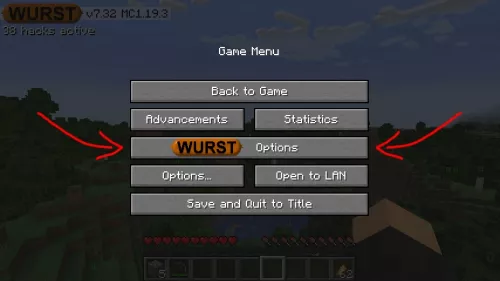
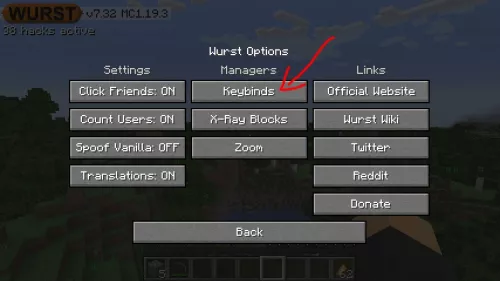
The Keybind Manager can be accessed by opening the Wurst Options menu from the pause screen and clicking on the “Keybinds” button, directly under the “Managers” heading.
Alternatively, as of Wurst 7.31, the Keybind Manager can also be opened from within the ClickGUI by clicking on the “Keybinds” button in the “UI Settings” window. It can also be accessed by searching for “keybinds”, “keybind manager”, or similar queries in the Navigator GUI and clicking on the first result (which will be a button named “Keybinds”). Both of these buttons display the tooltip “This is just a shortcut to let you open the Keybind Manager from within the GUI. Normally you would go to Wurst Options > Keybinds.”
Keybind Manager Layout
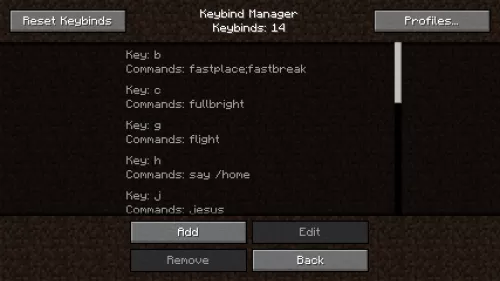
The Keybind Manager interface consists of several components that allow the user to view, add, edit, and delete keybinds.
At the center of the screen is the list of keybinds, displayed with their key and corresponding command(s). The number of keybinds is displayed at the top of the screen, beneath the heading “Keybind Manager”.
At the bottom of the screen are four buttons: “Add”, “Edit” (which is greyed out when no keybind is selected), “Remove” (which is also greyed out when no keybind is selected), and “Back”. The “Add” and “Edit” buttons bring up separate input screens where the key and command can be specified. The “Remove” button deletes the selected keybind from the list. The “Back” button closes the Keybind Manager and returns the user to the Wurst Options menu.
At the top left corner of the screen is the “Reset Keybinds” button, which restores the default keybinds and deletes any custom keybinds that have been created. It does not delete any custom keybind profiles that have been saved. At the top right corner is the “Profiles…” button, which opens up a separate screen that allows the user to save and load keybind profiles.
Adding Keybinds
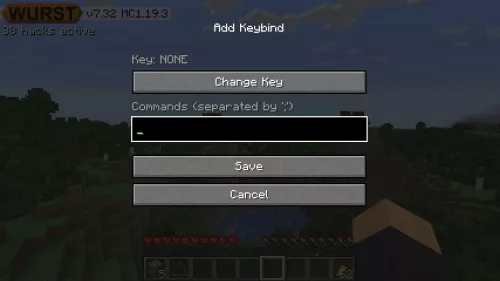
To add a new keybind, click on the “Add” button at the bottom of the Keybind Manager screen. This will bring up the “Add Keybind” screen.
On this screen, you can specify the key and command(s) for the new keybind. The key is selected by clicking on the “Change Key” button, which brings up a separate “Press a key” screen. The command(s) can be entered in the input field labeled “Commands”. Multiple commands can be separated by a semicolon (;).
The command can either be a Wurst command or the name of a hack. For example, the following 3 commands all have the same effect of toggling Killaura:
.t killaurat killaurakillaura
When separating multiple inputs with ;, they can be any mix of hack names and .commands:
.taco;goto ~10 ~ ~;killaura
It is also possible to keybind regular Minecraft /commands or chat messages by making use of Wurst's .say command:
.say /give @s some_item.say Hello world!
When you are finished specifying the key and command(s), click on the “Save” button to add the new keybind to the list. Click on the “Cancel” button to discard the changes and return to the Keybind Manager screen.
Editing Keybinds
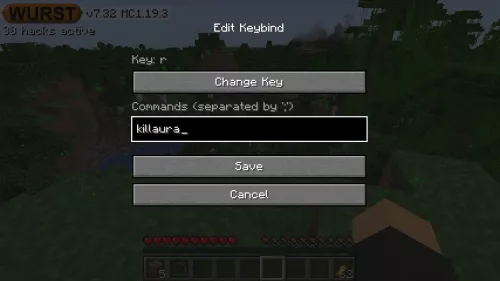
To edit an existing keybind, first select the keybind in the list by clicking on it. Then, click on the “Edit” button at the bottom of the Keybind Manager screen. This will bring up the “Edit Keybind” screen.
The “Edit Keybind” screen is almost identical to the “Add Keybind” screen, except that the title is different and that the key and commands are pre-filled with the old values.
On this screen, you can modify the key and command(s) for the keybind. The key is selected by clicking on the “Change Key” button, which brings up a separate “Press a key” screen. The command(s) can be edited in the input field labeled “Commands”. As always, multiple commands can be separated by a semicolon (;).
When you are finished modifying the key and command(s), click on the “Save” button to update the keybind in the list. Click on the “Cancel” button to discard the changes and return to the Keybind Manager screen.
Note that the “Edit” button will be greyed out and cannot be clicked if no keybind is selected in the list.
Removing Keybinds
To remove a keybind, first select the keybind in the list by clicking on it. Then, click on the “Remove” button at the bottom of the Keybind Manager screen. This will delete the keybind from the list.
Note that the “Remove” button will be greyed out and cannot be clicked if no keybind is selected in the list.
It is also possible to remove all keybinds at once by clicking on the “Reset Keybinds” button at the top left corner of the Keybind Manager screen. This button restores the default keybinds and deletes any custom keybinds that have been created. It does not delete any custom keybind profiles that have been saved. A confirmation message will appear before the keybinds are reset.
Keybind Profiles
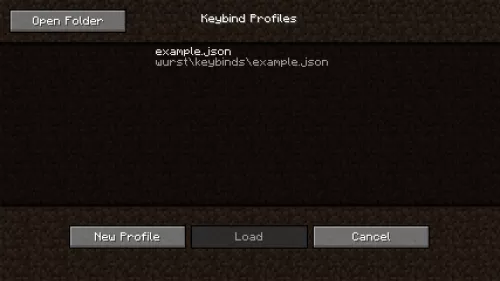
The Keybind Manager allows users to save and load different keybind profiles to easily switch between different sets of keybinds. To access the Keybind Profiles screen, click on the “Profiles…” button at the top right corner of the Keybind Manager screen.
The Keybind Profiles screen has a similar layout to the main Keybind Manager screen. The main area of the screen is taken up by a list of keybind profiles, displayed with their file names. All keybind profiles are saved as .json files and located in the “keybinds” folder in the Wurst directory, which can be found at %appdata%\.minecraft\wurst\keybinds on Windows. There is also an “Open Folder” button at the top left corner of the screen that opens this location.
At the bottom of the screen are three buttons: “New Profile”, “Load” (which is greyed out when no profile is selected), and “Cancel”. The “New Profile” button allows you to create a new profile with your current set of keybinds. You will be prompted to enter a file name for the new profile. The “Load” button allows you to load a selected keybind profile, replacing your current set of keybinds with the ones in the profile. The “Cancel” button closes the Keybind Profiles screen and returns you to the Keybind Manager screen.
Note that there is currently no “Edit” button for keybind profiles. If you want to make changes to a keybind profile, you will need to open the .json file in a text editor. Keybind profiles can be shared with others by simply giving them the corresponding .json file.
Changes
| Version | Changes |
|---|---|
| Wurst 1.1 Beta | Added keybinds, but at this point they cannot be changed yet. |
| Wurst 1.4 Beta | Keybinds are now loaded from a file. At this point there is no UI for changing the keybinds in-game yet. |
| Wurst 1.5 Beta | Fixed special keys (e.g. the media keys on some keyboards) toggling all hacks that don't have a keybind (with predictably chaotic results). |
| Wurst 1.5.1 Beta | Fixed the keybinds file randomly resetting itself to the default state, thereby erasing any custom keybinds. |
| Wurst 1.10 Beta | Added Keybind Manager. |
| Wurst 1.3.1 | Slightly improved the Keybind Manager in an unspecified way. |
| Wurst 1.7 | Keybinds are now saved in a different format. A “Converter.jar” tool was released separately to help with converting older keybind files. |
| Wurst 1.14.2 | Fixed a rare crash when deleting a keybind. |
| Wurst 2.3 | Added a “Reset Keybinds” button to Keybind Manager. |
| Wurst 2.10 | Trying to keybind a setting that has spaces in its name will no longer result in a syntax error. |
| Wurst 3.0pre3 | Fixed the Keybind Manager not letting you select keybinds from the list. |
| Wurst 2.23 (Minecraft 1.8), Wurst 3.1 (Minecraft 1.9) | Keybinds can now run multiple commands at once. |
| Updated the default keybinds. | |
| Wurst 3.4 | Fixed keybinds for ModeSettings with spaces not working. |
| Wurst 6.4 | The Keybind Manager will now allow you to make keybinds that run the same command multiple times. |
| When binding a key to multiple commands, the Keybind Manager will now remember the order in which you specified the commands. | |
| You can now make keybinds that make keybinds that make keybinds that… you get the idea. | |
| Wurst 6.7 | Changed the default keybind for Nuker to N. |
| Wurst 6.11 | Keybinds can now be set to either toggle hacks or run commands. |
| Keybinds that don't start with a dot will now be interpreted as commands rather than chat messages. | |
In addition to using ; in keybinds to separate multiple hacks/commands, one can now also use ;; to run a single command that contains ;. |
|
| Improved Keybind Manager performance. | |
Keybinds are now saved in a different format, but older keybinds.json files will be updated automatically. |
|
| Wurst 6.21 | Added a default keybind for the window-based ClickGUI: Right CTRL. |
| Wurst 6.26 | Fixed a bug that caused all keybinds to be deleted if the keybinds.json file got corrupted. |
| Wurst 7.0pre1 | Temporarily removed the Keybind Manager. |
Minecraft's keybinds work differently since they updated to LWJGL 3. As a result, your keybinds.json files from previous Wurst versions will no longer work. |
|
| You can now use keybinds while the ClickGUI is open. | |
| Wurst 7.0pre3 | Fixed an issue where the default keybinds would not be created if the .minecraft/wurst folder contained a keybinds.json file from an older version. |
| Wurst 7.0pre14 | Re-added the Keybind Manager. |
| Wurst 7.1 | Added keybind profiles. |
| Added a “Profiles…” button to the Keybind Manager that lets you manage your keybind profiles without using chat commands. | |
| Wurst 7.31 | Added a shortcut to open the Keybind Manager from within Navigator or ClickGUI. |

